
How to Withdraw USDT
The Withdraw page lets you transfer USDT from your BrokerIG account to a personal wallet or external exchange. Because this action decreases your balance and blockchain transactions are generally irreversible, carefully verify the address, network, amount, fee, and security-verification step.
The withdrawal flow has three main parts:
- Enter Withdrawal Details. Select the token, network, receiving wallet address, and amount.
- Complete Security Verification. Verify with an email Verification Code or with 2FA when Two-Factor Authentication is enabled.
- Review & Confirm. Review all information before submitting the withdrawal request.
Before you withdraw
Section titled “Before you withdraw”Prepare the following:
- A receiving wallet address that supports USDT.
- The corresponding receiving network: ETH/ERC-20 or BSC/BEP-20.
- Access to your registered email if email verification is required.
- Access to your Authenticator App if 2FA is enabled.
- Enough Available Balance to cover the withdrawal amount and any fee deducted from the account.
Step 1: Select the currency
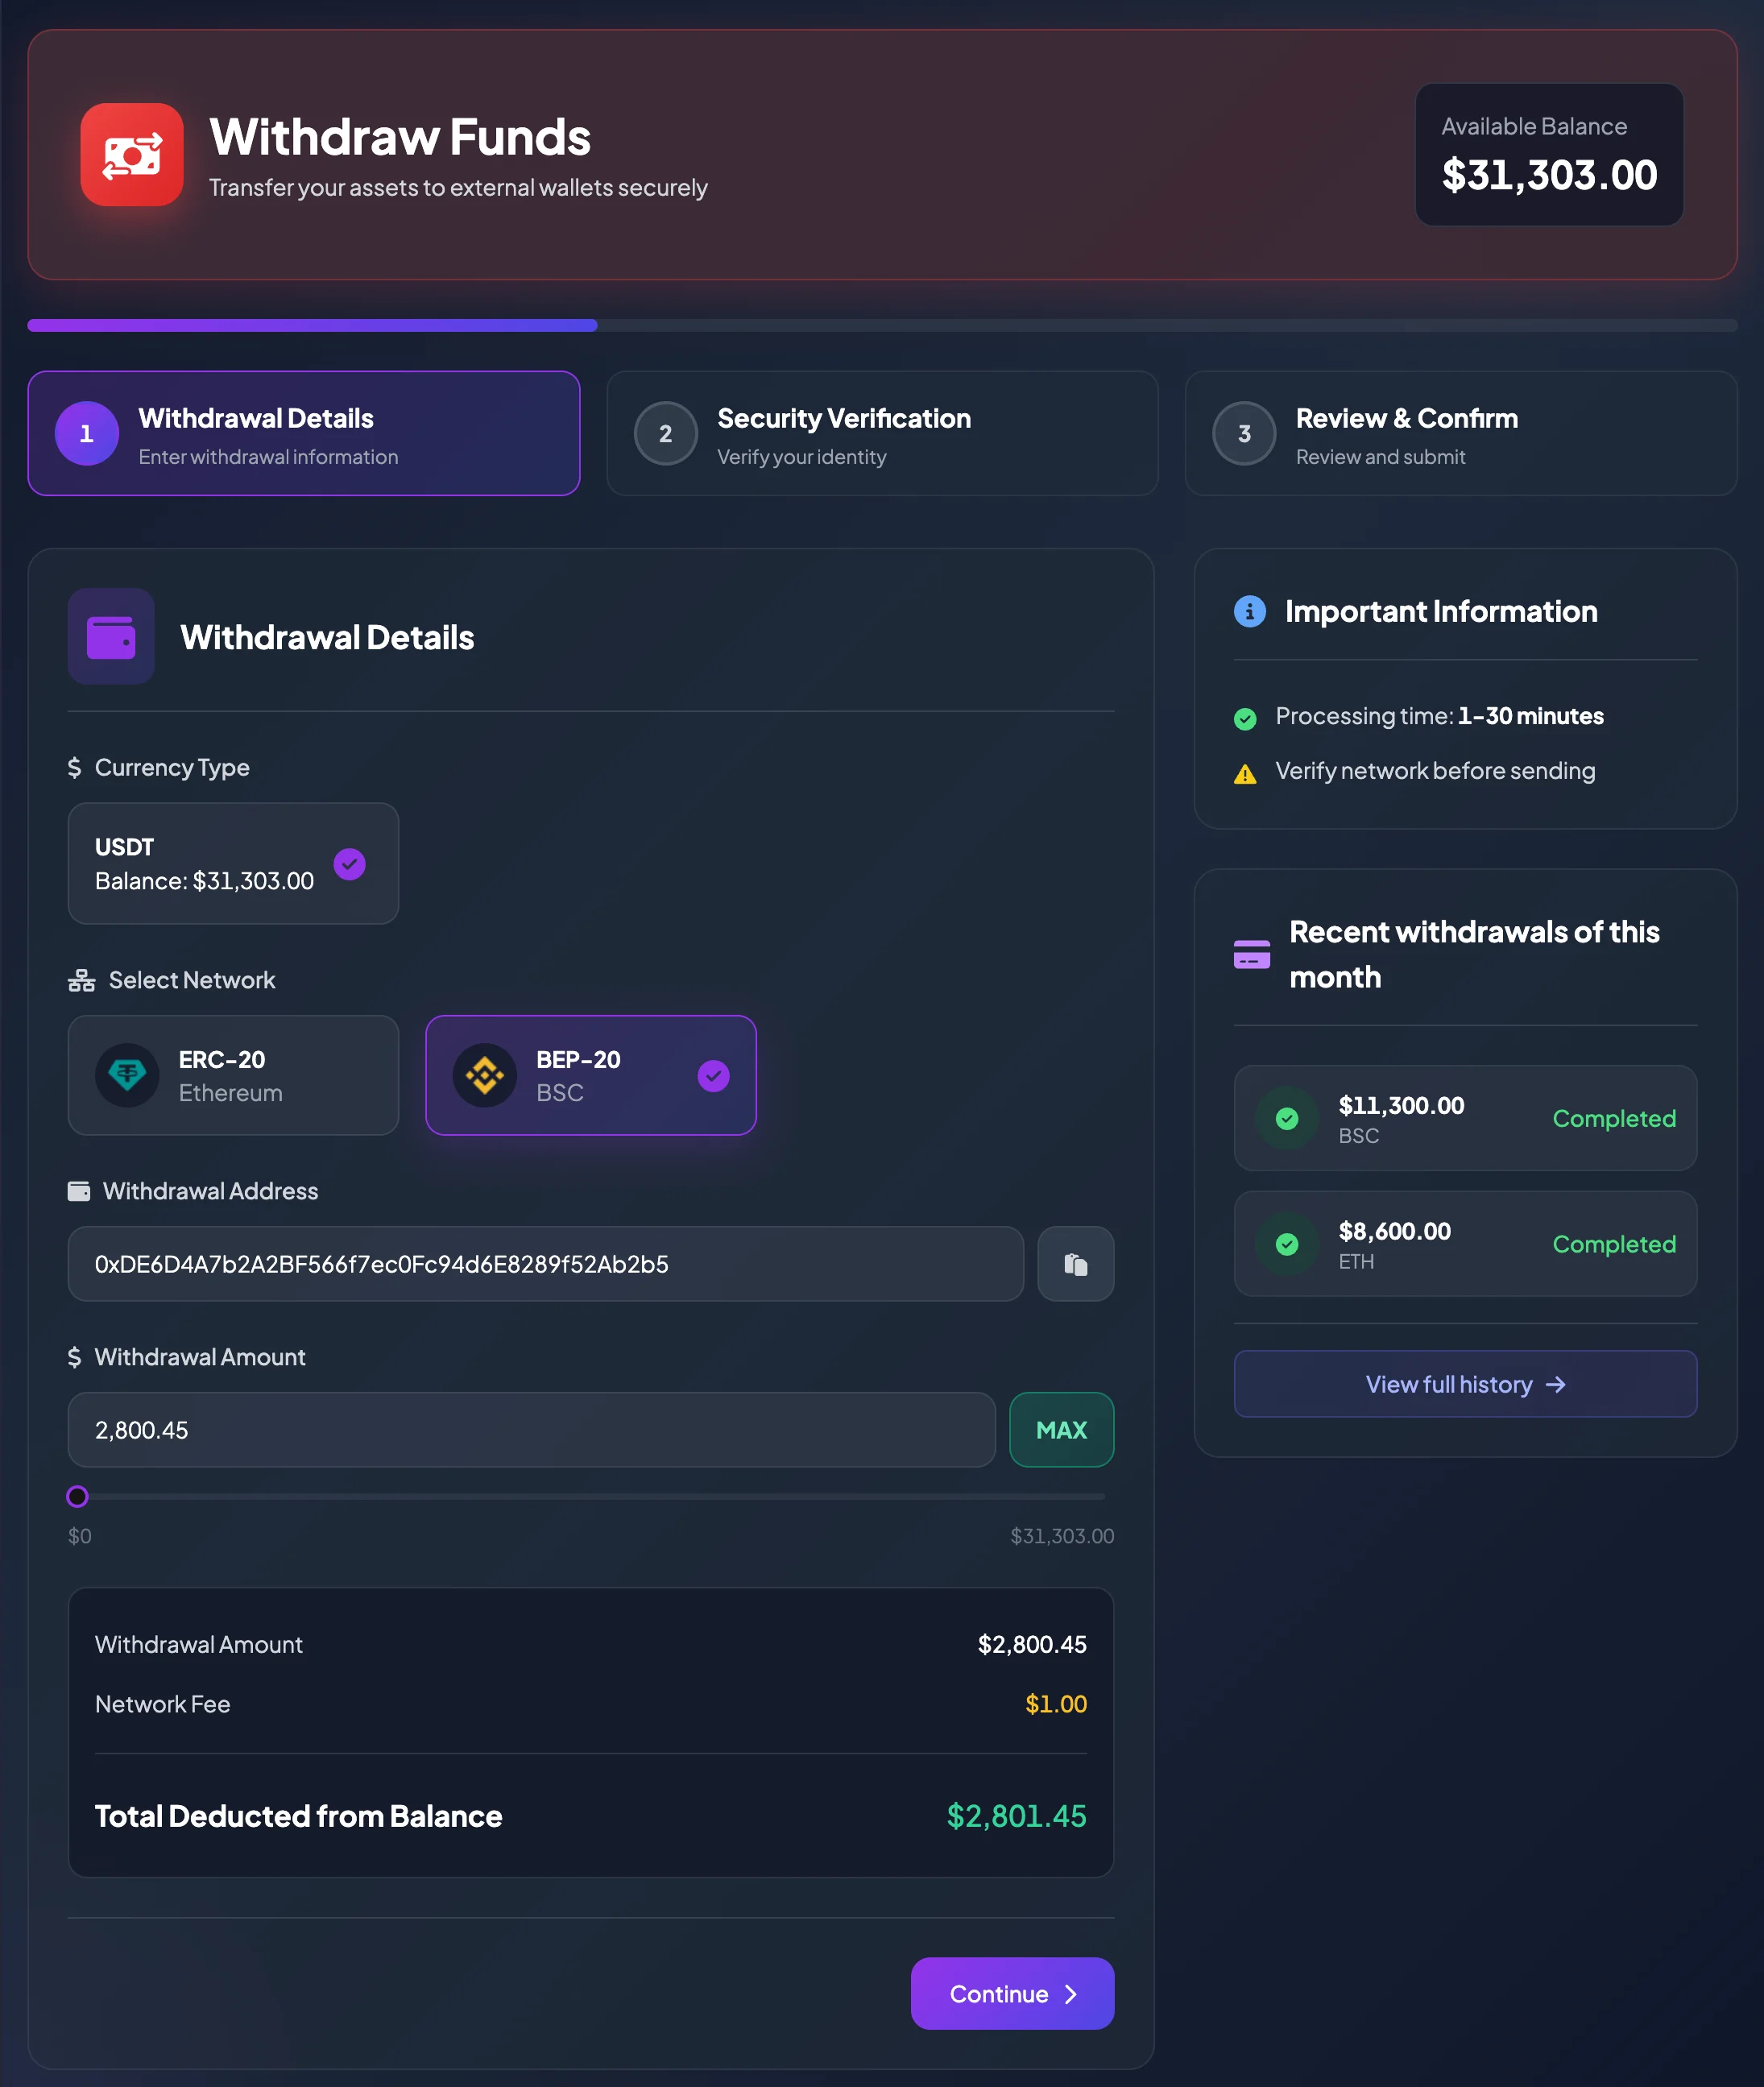
Section titled “Step 1: Select the currency”The withdrawal currency is USDT. The system also displays your current or Available Balance so you know the maximum amount available under the current conditions.
If the balance appears insufficient, check whether:
- An investment or campaign is currently holding funds.
- Another withdrawal is still processing.
- A recent deposit has not yet been credited.
Step 2: Select the withdrawal network
Section titled “Step 2: Select the withdrawal network”Select the network supported by the receiving wallet:
| BrokerIG network | The receiving wallet must support |
|---|---|
| ERC-20 / Ethereum | USDT ERC-20 on Ethereum. |
| BEP-20 / BSC | USDT BEP-20 on BNB Smart Chain. |
Do not select a network only because it has a lower fee. The receiving wallet must support the exact network you select.
Step 3: Enter the Withdrawal Address
Section titled “Step 3: Enter the Withdrawal Address”Paste the receiving wallet address into Withdrawal Address.
Recommended steps:
- Copy the address directly from the receiving wallet or exchange.
- Paste it into BrokerIG.
- Compare the first and last several characters.
- Confirm that the address belongs to the selected network.
Do not type the address manually. One incorrect character may result in permanent loss.
Step 4: Enter the Withdrawal Amount
Section titled “Step 4: Enter the Withdrawal Amount”Enter the amount of USDT you want to withdraw. You can use MAX to use the maximum Available Balance under the current conditions.
After entering the amount, review:
- Withdrawal Amount
- Network Fee
- You Will Receive
- Total Deducted from Balance
- Minimum Withdrawal
- Processing Time
- Daily Limit, if applicable
Pay particular attention to Total Deducted from Balance, because this is the total amount removed from your balance.
Step 5: Continue to Security Verification
Section titled “Step 5: Continue to Security Verification”Once the details are complete, select Continue to move to Security Verification.
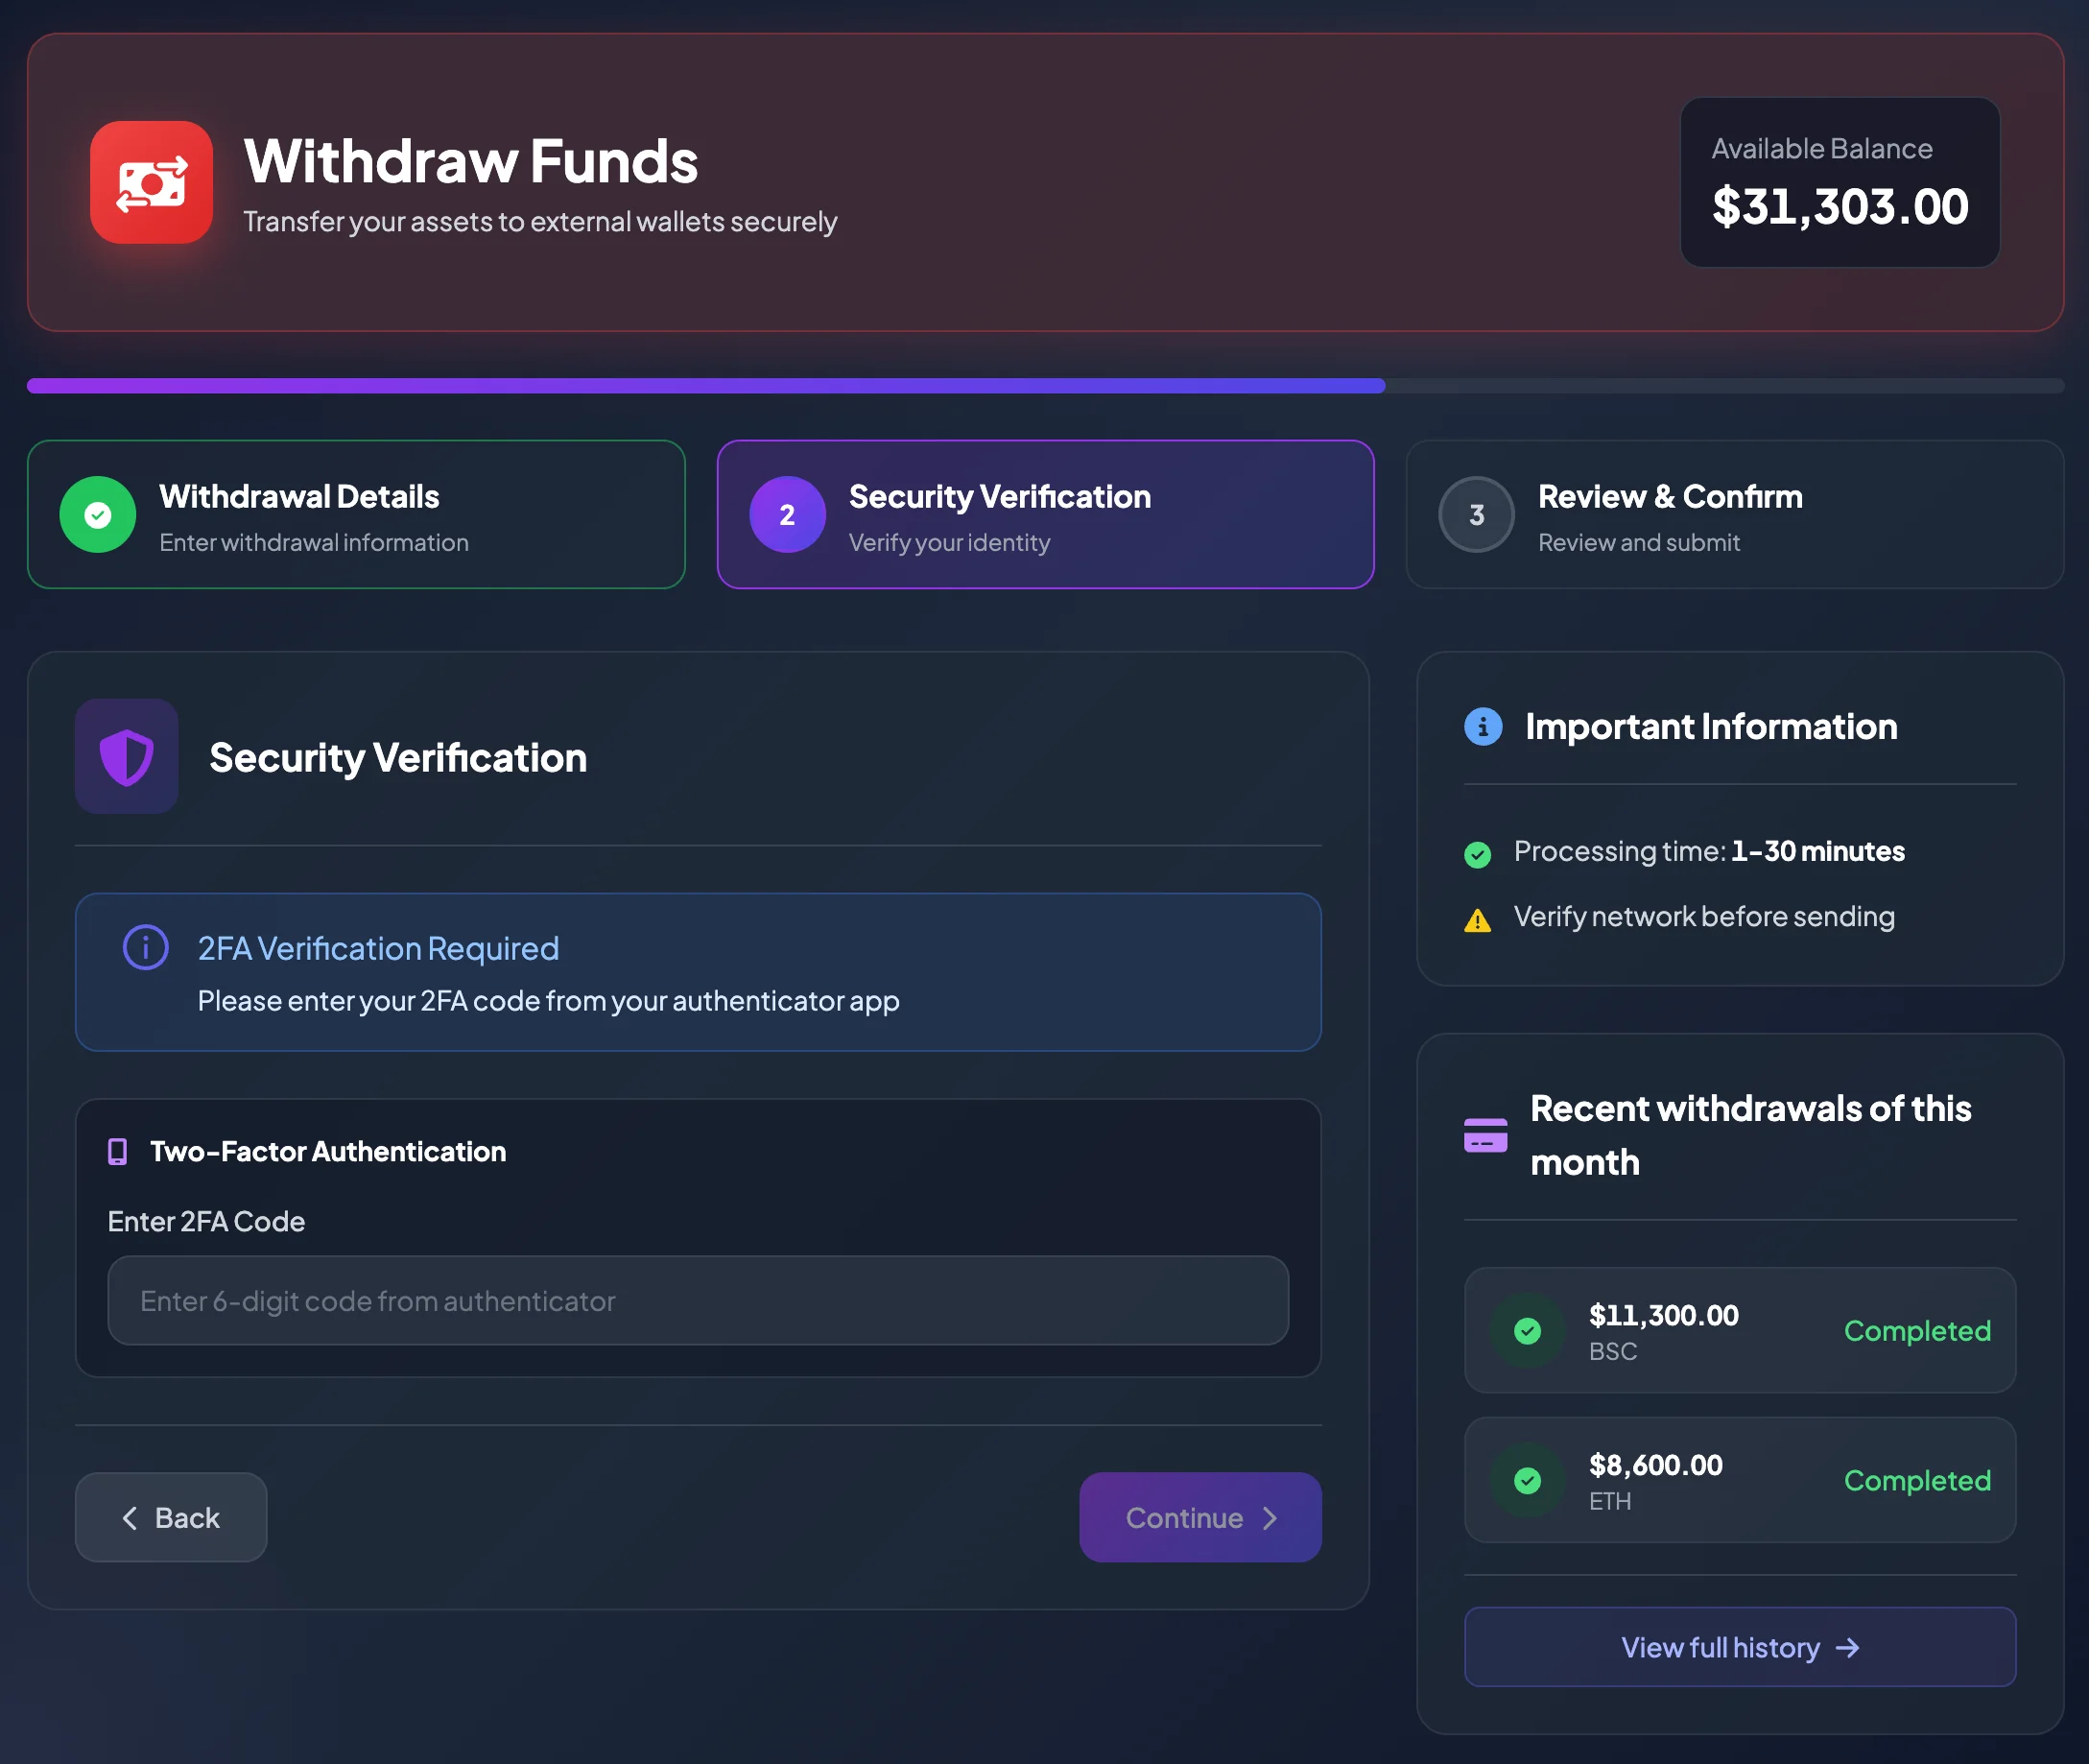
The verification method depends on your account security settings:
| Account status | Verification method |
|---|---|
| Two-Factor Authentication is disabled | Verification Code sent to your registered email. |
| Two-Factor Authentication is enabled | Authentication Code from your Authenticator App. |
When 2FA is enabled, the withdrawal flow uses 2FA instead of relying only on an email OTP.
Step 6: Enter the email Verification Code or 2FA code
Section titled “Step 6: Enter the email Verification Code or 2FA code”Email Verification Code
Section titled “Email Verification Code”- Select Send Verification Code or Get Verification Code.
- Open the email registered to your account.
- Copy the latest Verification Code.
- Enter it on the Security Verification screen.
- Complete the step before the code expires.
If the email does not arrive, check Spam or Junk, verify the registered email address, and try Resend Code after a short wait.
Two-Factor Authentication
Section titled “Two-Factor Authentication”- Open Google Authenticator, Microsoft Authenticator, or another configured Authenticator App.
- Select the BrokerIG account entry.
- Enter the current 6-digit Authentication Code.
- Submit it before the code expires.
If the code is repeatedly rejected, check that your phone time is set automatically, verify that you selected the correct BrokerIG entry, and try the next code.
Step 7: Review Withdrawal Details
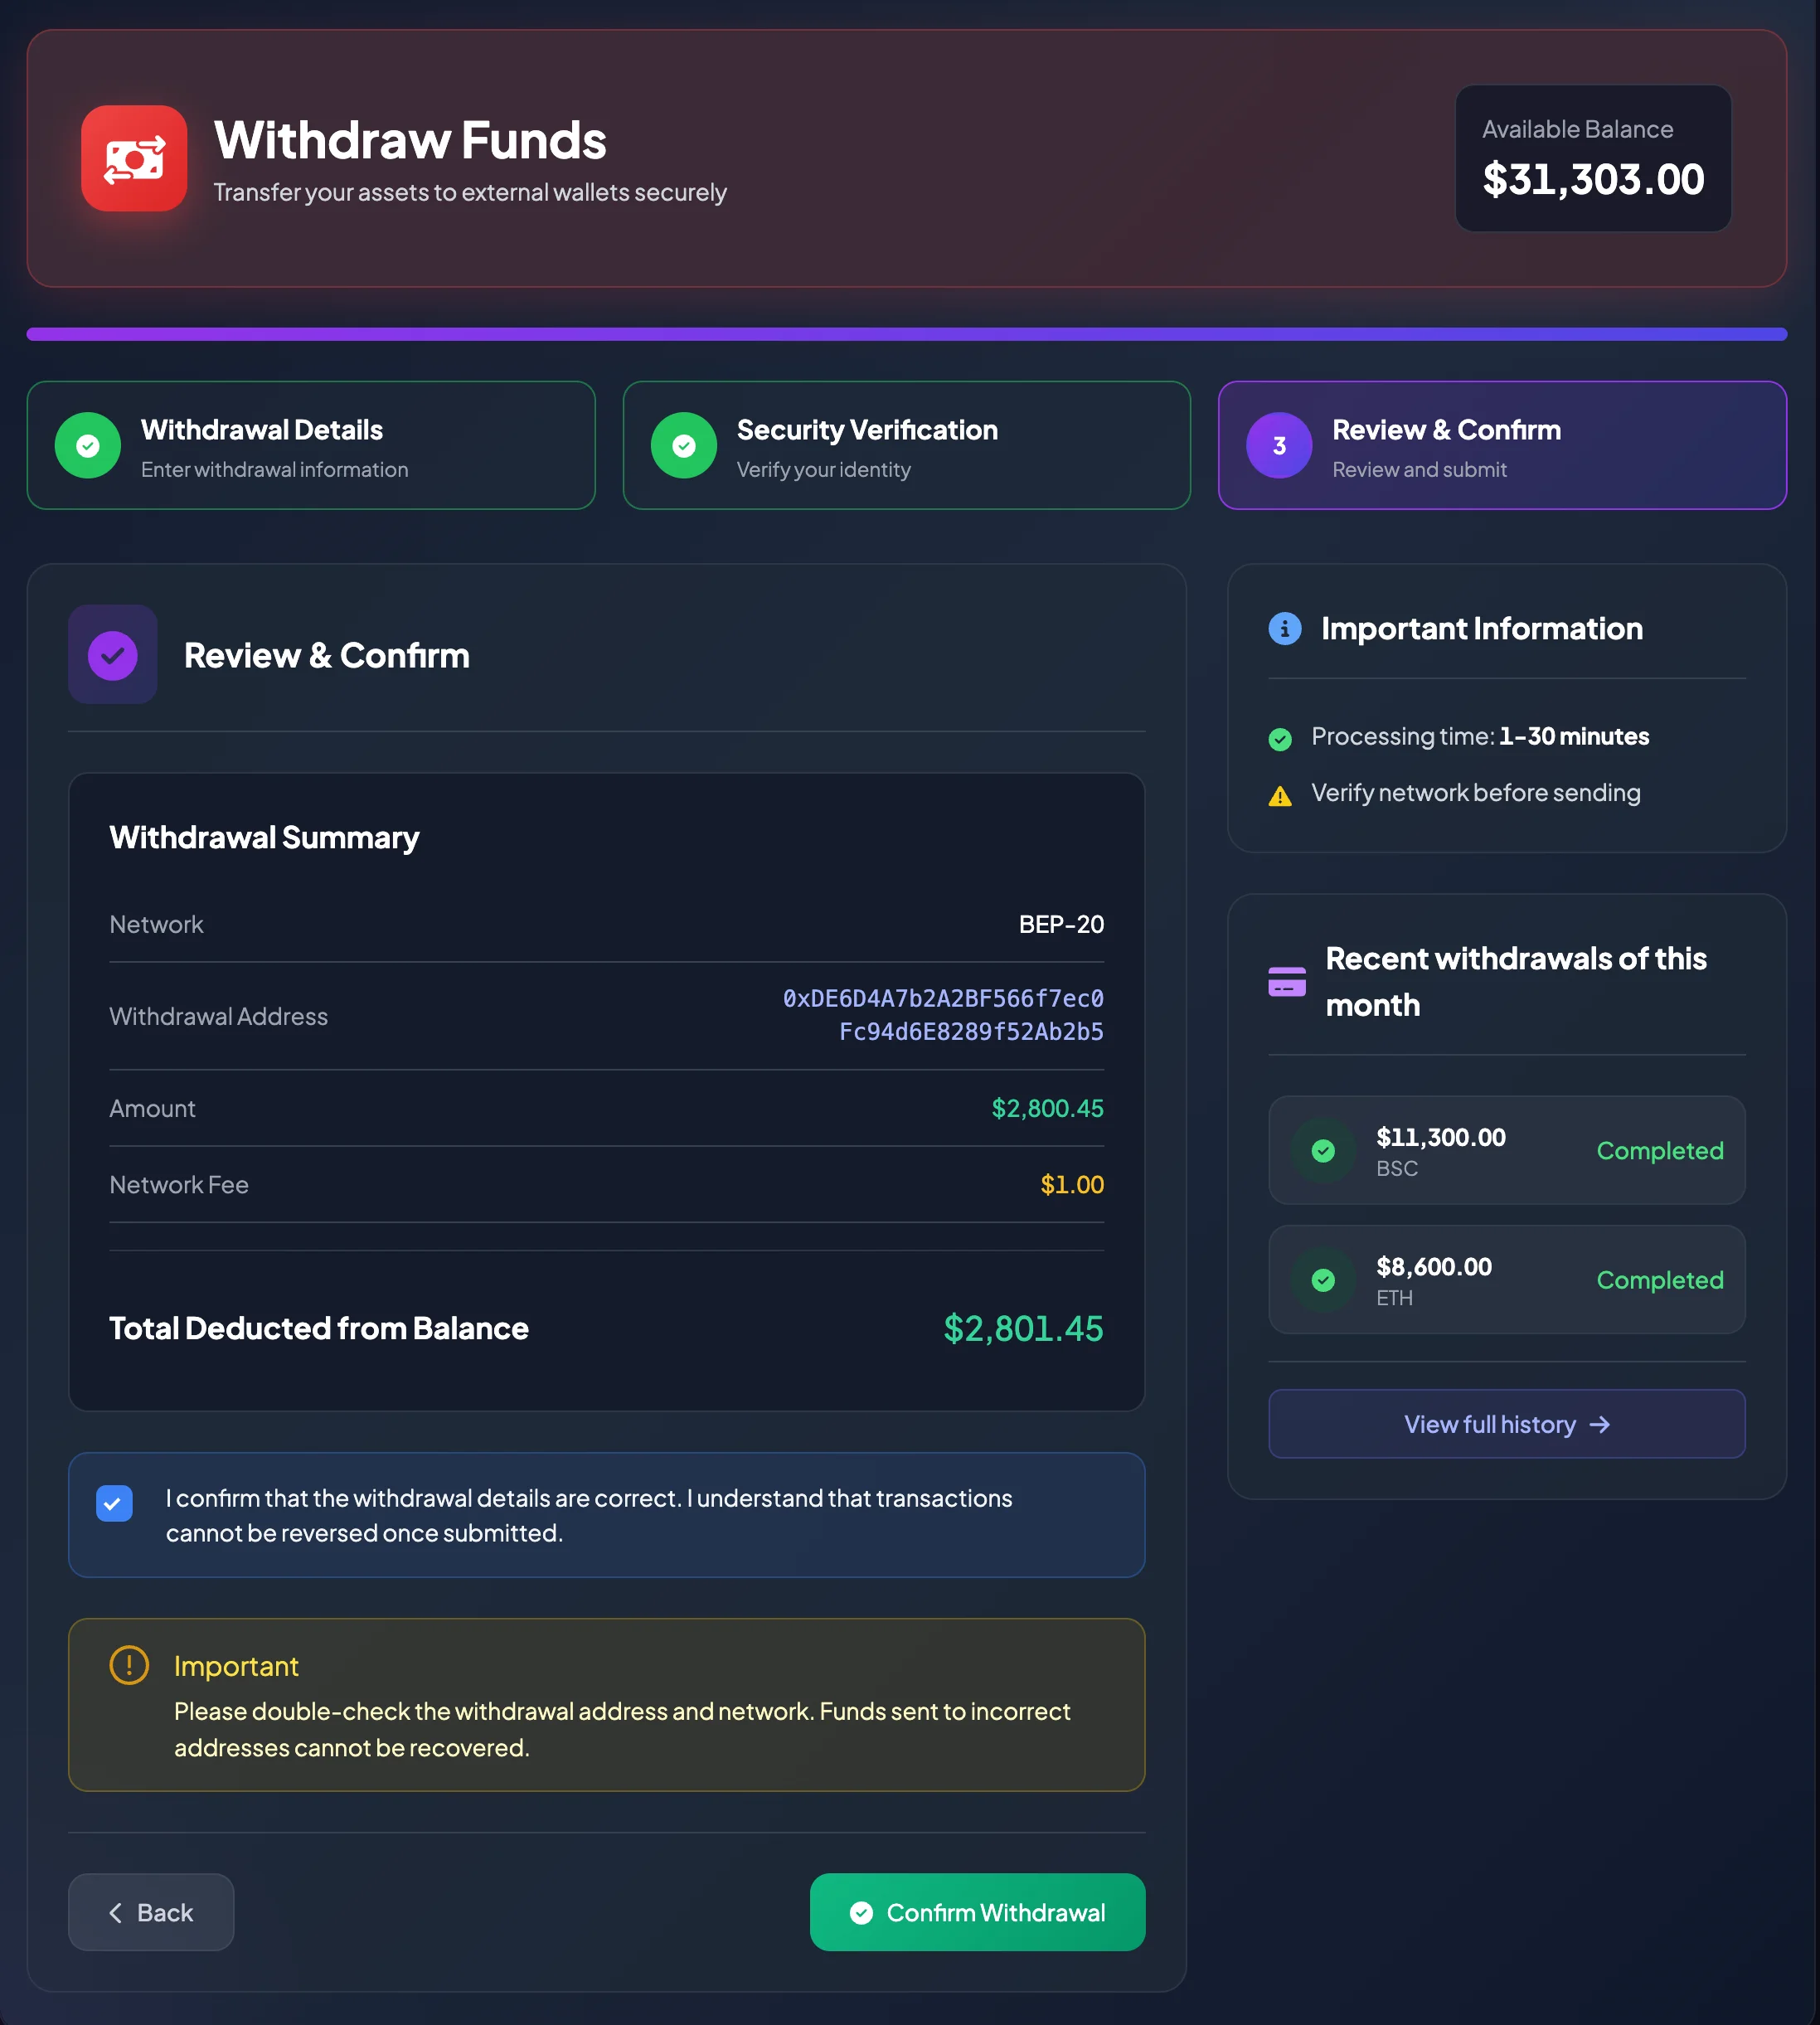
Section titled “Step 7: Review Withdrawal Details”Before the final confirmation, the system displays a withdrawal summary. This step is critical.
Review:
- The token is USDT.
- The network matches the receiving wallet.
- The Withdrawal Address is correct.
- The Withdrawal Amount is correct.
- The Network Fee and Total Deducted from Balance are correct.
- The expected Processing Time is acceptable.
Confirm only when all information is correct.
You may also need to select a confirmation such as:
I confirm that the withdrawal details are correct. I understand that transactions cannot be reversed once submitted.
Then select Confirm Withdrawal.
Step 8: Track the withdrawal status
Section titled “Step 8: Track the withdrawal status”After submission, open Deposit and Withdrawal History to track the request.
A withdrawal may move through statuses such as:
| Status | Meaning |
|---|---|
| Processing | The request was received and is being processed. |
| Completed | The withdrawal was processed successfully. |
| Failed | The withdrawal did not complete. If funds were already deducted, the system may issue a refund through the refund flow. |
When a TxHash is available, use it to inspect the transaction on the blockchain explorer for the selected network.
Recent withdrawals
Section titled “Recent withdrawals”The Withdraw page may display recent withdrawals for the current month. This section lets you review recent requests without opening the complete history page.
Select View All History to open Deposit and Withdrawal History.
Common withdrawal issues
Section titled “Common withdrawal issues”| Situation | Possible cause | What to do |
|---|---|---|
| Cannot continue | Address or amount is missing, or amount is below the minimum | Review the form and Minimum Withdrawal. |
| Insufficient balance | Withdrawal amount plus fee exceeds Available Balance | Reduce the amount or deposit additional USDT. |
| Email code does not arrive | Email delay, Spam folder, or incorrect registered email | Check Spam, wait, and resend the code. |
| 2FA code is incorrect | Expired code, wrong Authenticator entry, or incorrect device time | Wait for the next code and check phone time. |
| Withdrawal remains pending | BrokerIG or the blockchain network is still processing it | Check history and TxHash, then contact Support if the expected time is exceeded. |
| Wrong network selected | The receiving wallet does not support the selected network | Contact the receiving wallet or exchange and BrokerIG Support. Recovery may be limited. |
Withdrawal security notes
Section titled “Withdrawal security notes”- Never provide an OTP, Authentication Code, private key, seed phrase, or Recovery Code to anyone.
- Do not withdraw to an address sent by an unknown person through chat.
- If you suspect clipboard malware, carefully compare the address after pasting.
- For a new receiving address, consider testing with a small amount before making a large withdrawal.
- Enable Two-Factor Authentication to strengthen withdrawal security.
After the withdrawal
Section titled “After the withdrawal”After the withdrawal is completed:
- Check Deposit and Withdrawal History for the status and TxHash.
- Check the receiving wallet or exchange to confirm that USDT arrived.
- Open Balance History to reconcile the deduction.
- Save the TxHash if you may need it for later reconciliation.