How to Deposit USDT
The Deposit page lets you transfer USDT from a personal wallet or external exchange into your BrokerIG account. Once the blockchain transaction is confirmed and recorded by the system, your USDT balance increases.
The current deposit flow focuses on USDT on two networks:
- Ethereum / ERC-20 / ETH
- BNB Smart Chain / BEP-20 / BSC
Before you deposit
Section titled “Before you deposit”Before transferring USDT, verify the following:
| Check | Why is it important? |
|---|---|
| Token | Only deposit USDT when the screen displays a USDT deposit address. |
| Network | Select the correct ETH/ERC-20 or BSC/BEP-20 network. |
| Deposit Address | Copy it directly from BrokerIG; do not type it manually. |
Step 1: Select the deposit network
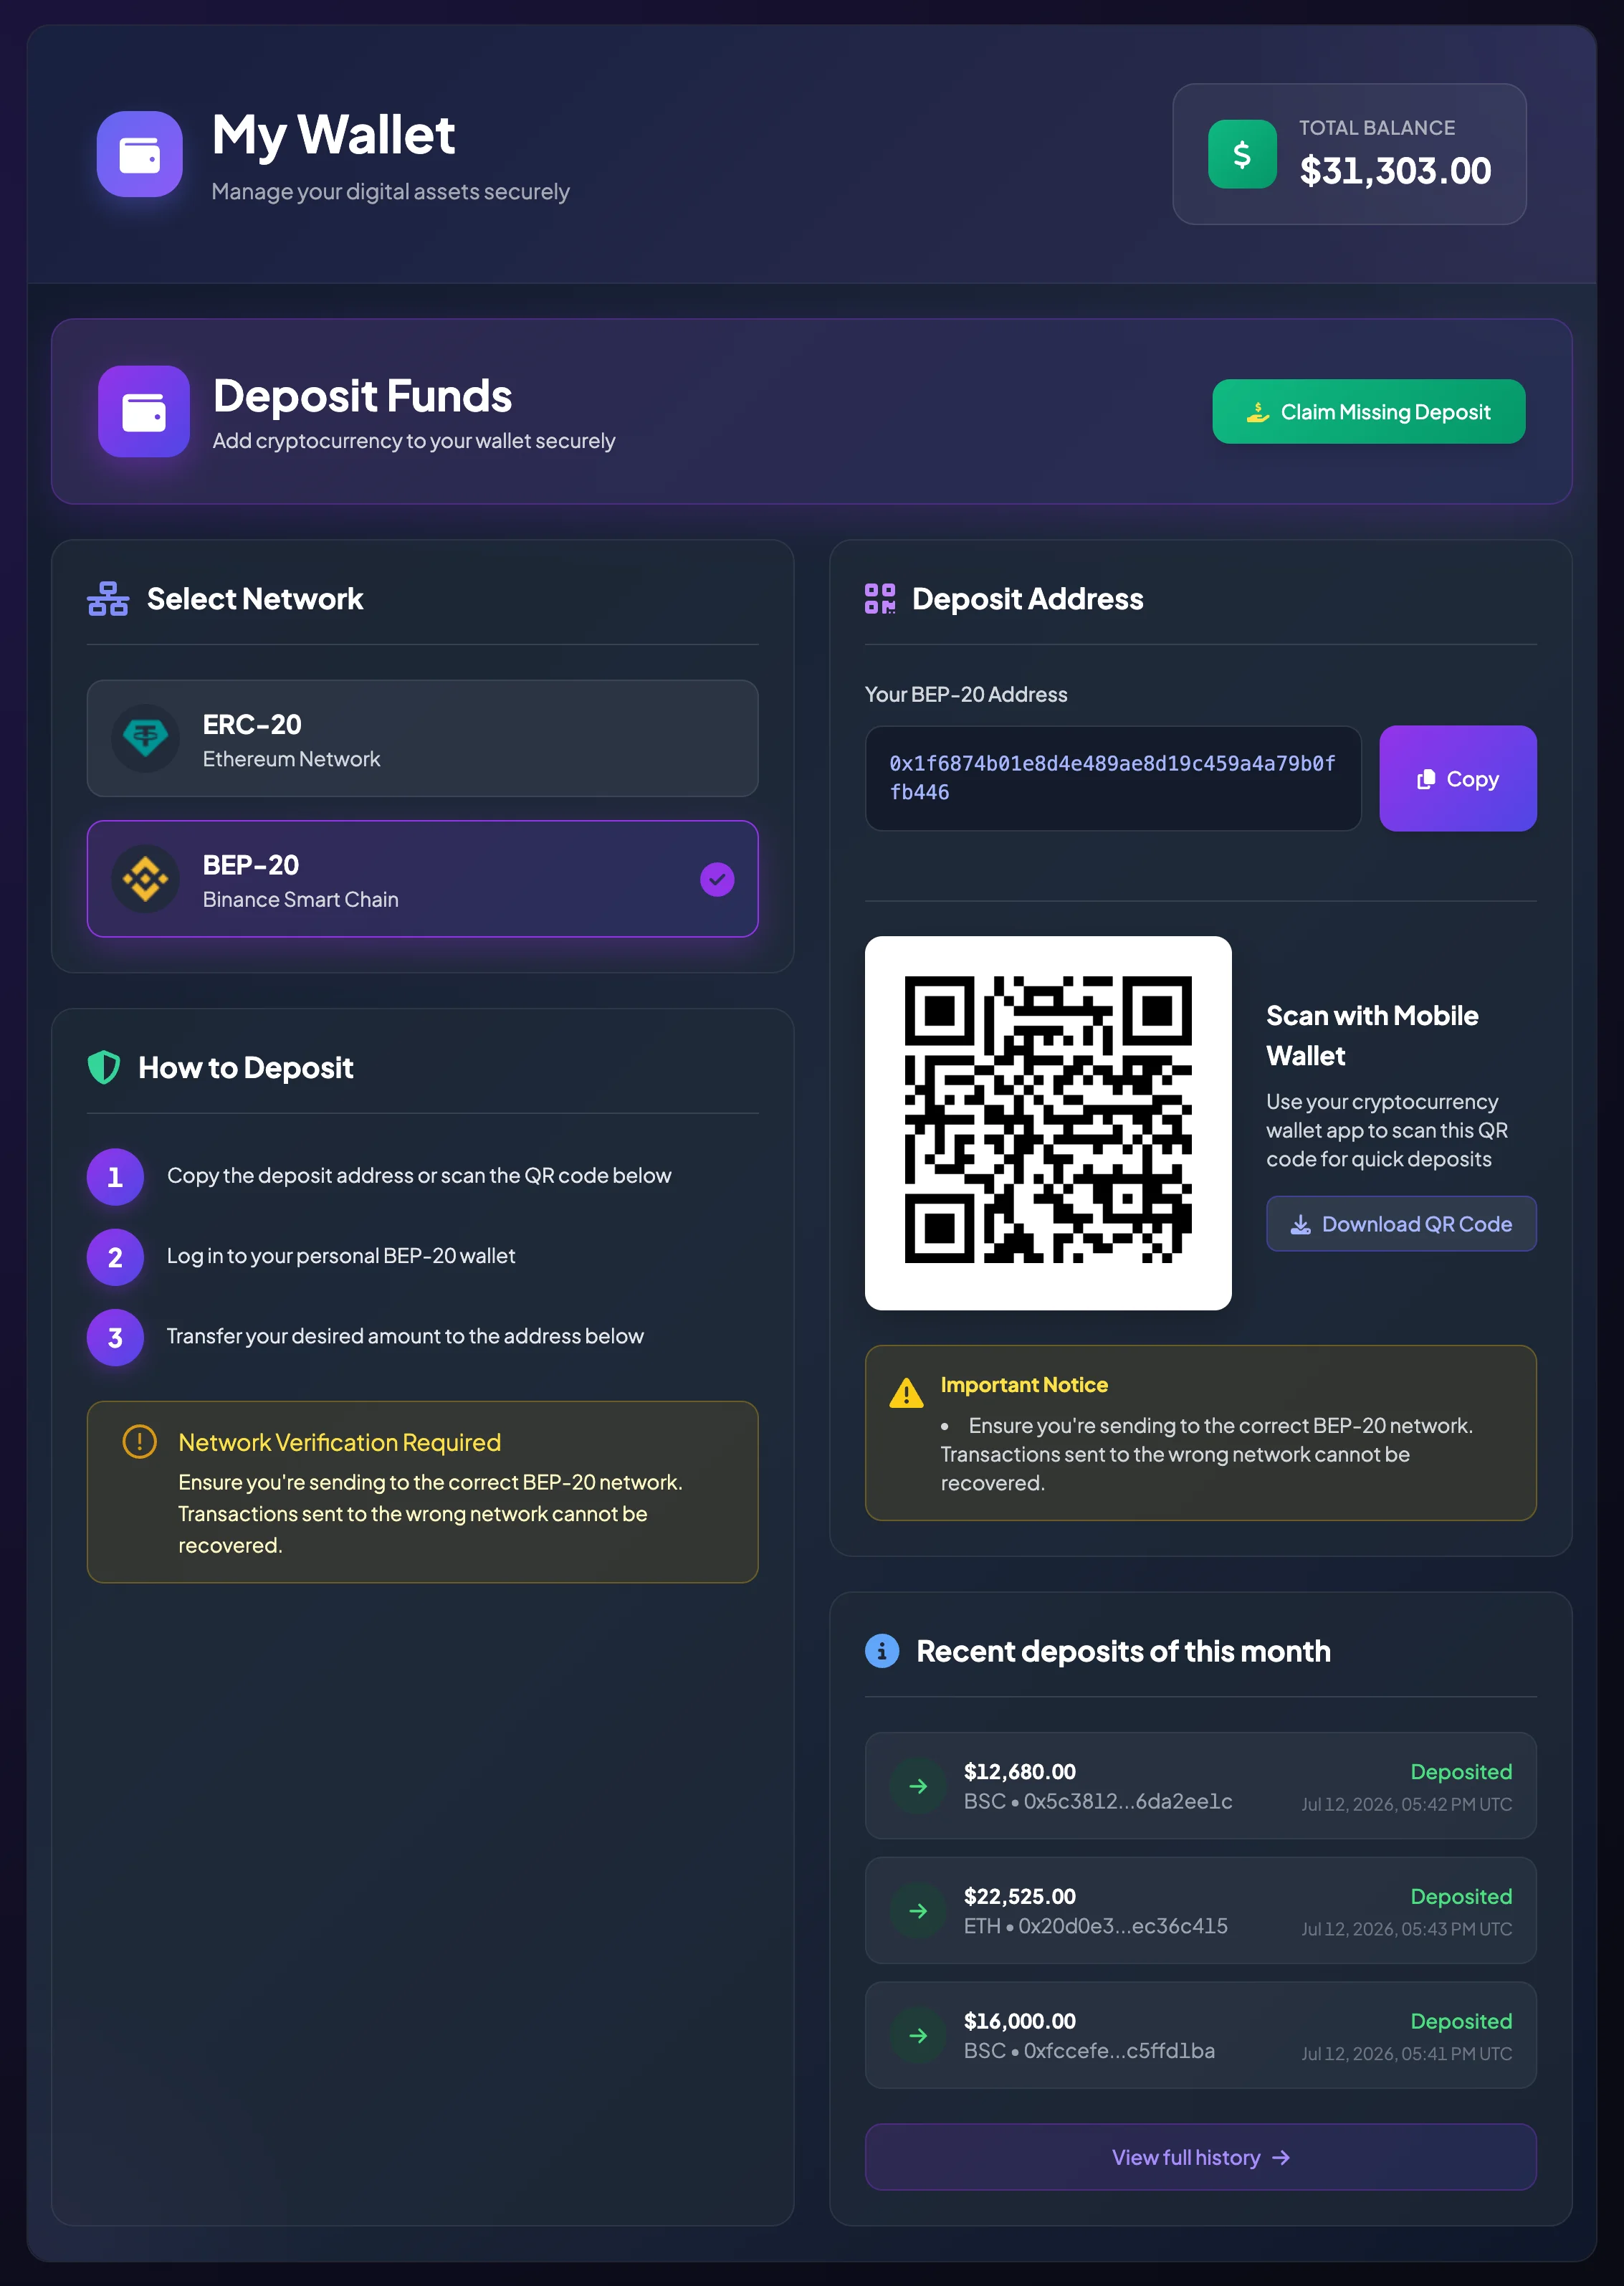
Section titled “Step 1: Select the deposit network”Open Finance → Deposit, then select the network you want to use.
You may see options such as:
- ERC-20 / Ethereum Network
- BEP-20 / Binance Smart Chain
Select the same network used by the wallet or exchange from which you are sending. If you are unsure, check the withdrawal or transfer screen of the sending wallet before proceeding.
Step 2: Copy the Deposit Address
Section titled “Step 2: Copy the Deposit Address”After selecting a network, the system displays your Deposit Address for that network. You can:
- Select Copy Address.
- Scan the QR Code with a mobile wallet.
- Download the QR Code if you need to use it on another device.
Do not type a blockchain address manually. Addresses are long, and a single incorrect character may send funds to the wrong destination.
Step 3: Send USDT from an external wallet
Section titled “Step 3: Send USDT from an external wallet”Open your personal wallet or external exchange, select the USDT send or withdrawal function, and enter:
- Token: USDT.
- Network: ETH/ERC-20 or BSC/BEP-20, matching the network selected on BrokerIG.
- Receiving address: the address copied from BrokerIG.
- Amount: the amount of USDT you want to deposit.
Before confirming in the external wallet, verify the address, network, and amount at least twice.
Step 4: Wait for network confirmations
Section titled “Step 4: Wait for network confirmations”After the transfer is submitted, the transaction must be confirmed on the blockchain. Update time depends on the network, gas fee, confirmation requirements, and BrokerIG processing.
Do not submit the same transaction repeatedly while waiting. Use the TxHash to check the transaction on the appropriate blockchain explorer.
Step 5: Check Deposit and Withdrawal History
Section titled “Step 5: Check Deposit and Withdrawal History”After processing, open:
Finance → Deposit and Withdrawal History
You can review:
- Transaction Type: Deposit.
- USDT Amount.
- ETH or BSC network.
- Address or TxHash.
- Transaction Status.
- Date and time.
Once the amount is credited, the corresponding event should also appear in Balance History.
What is Claim Missing Deposit?
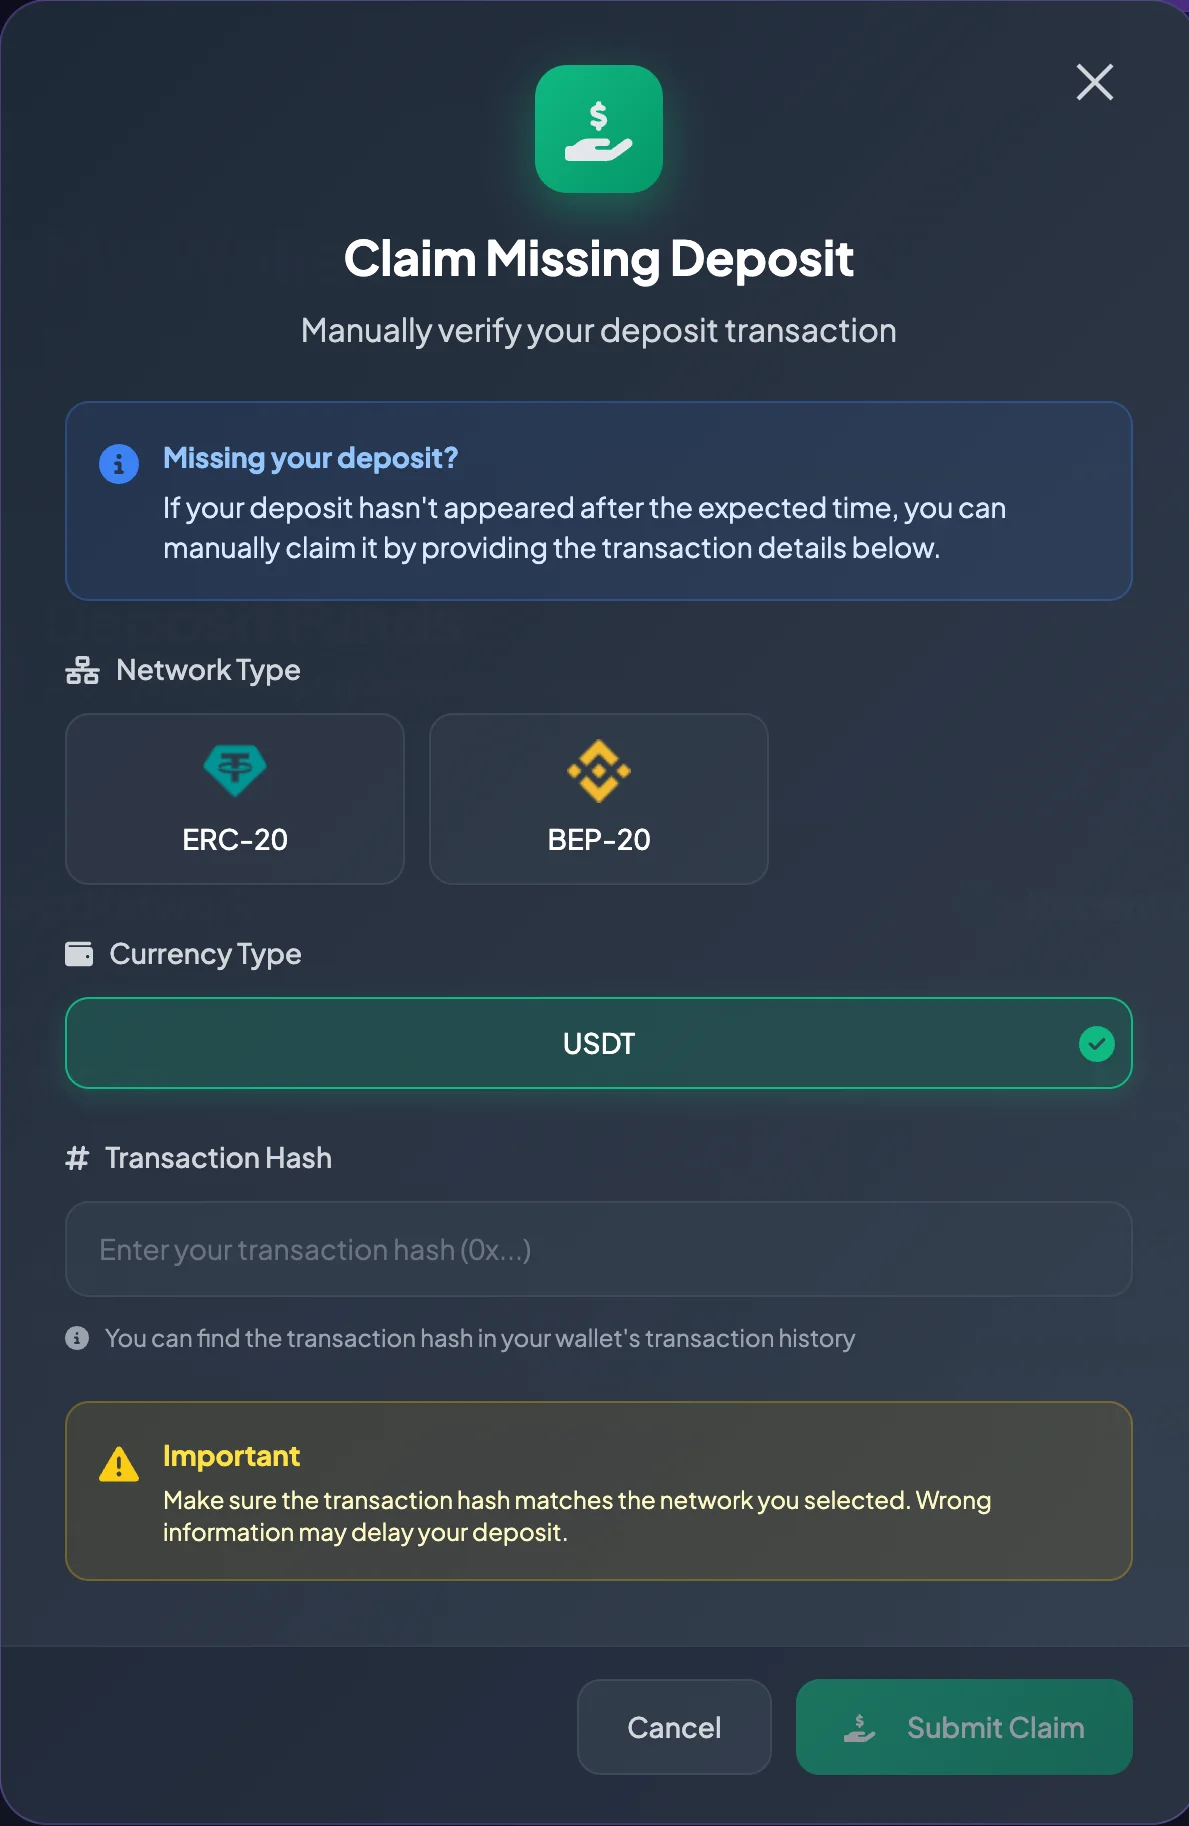
Section titled “What is Claim Missing Deposit?”The Deposit page includes Claim Missing Deposit. Use this function when you sent USDT to the correct Deposit Address, the transaction is confirmed on-chain, but your BrokerIG balance has not updated after a reasonable amount of time.
Do not submit a claim while the transaction is still unconfirmed or when you do not have a TxHash.
When should you submit a missing-deposit claim?
Section titled “When should you submit a missing-deposit claim?”Submit a claim only when all of the following are true:
- You sent USDT to the Deposit Address provided by BrokerIG.
- You used the correct ETH or BSC network.
- You have a TxHash.
- The blockchain explorer shows the transaction as successful or sufficiently confirmed.
- Your BrokerIG balance has not increased.
- The transaction is missing from history or shows an abnormal status.
Information to prepare for the claim
Section titled “Information to prepare for the claim”Prepare the following information:
| Information | Example |
|---|---|
| Network | ETH/ERC-20 or BSC/BEP-20 |
| Token | USDT |
| Amount | 100 USDT |
| TxHash | Blockchain transaction hash |
Enter the TxHash exactly as shown on the blockchain explorer. Do not submit a wallet address in place of a TxHash.
Common deposit issues
Section titled “Common deposit issues”| Situation | What to do |
|---|---|
| Correct address, but confirmations are incomplete | Wait and check the TxHash on the blockchain explorer. |
| Wrong network | Contact Support. Recovery may be limited or unavailable. |
| Token other than USDT was sent | Contact Support and do not send another test transaction. |
| Amount is below the minimum deposit | Check the Minimum Deposit displayed on the screen and contact Support if needed. |
| TxHash does not exist | Check the sending wallet or exchange. The transaction may not have been broadcast. |
| Receiving address differs from the BrokerIG Deposit Address | Review the external wallet history. If funds were sent to the wrong address, BrokerIG may not be able to recover them. |
Deposit security notes
Section titled “Deposit security notes”- Only deposit to an address displayed inside your own account.
- Do not use a deposit address sent through a private message, unknown email, or another person.
- Never provide a private key, seed phrase, OTP, 2FA code, or Recovery Code to anyone.
- Do not send funds from an untrusted wallet or exchange.
- If the Deposit Address changes unexpectedly, stop and contact Support.
After a successful deposit
Section titled “After a successful deposit”After your balance increases, you can:
- Check USDT Wallet and Balance.
- Review Deposit and Withdrawal History.
- Reconcile the entry in Balance History.
- Review Account Levels and Profit Rates if you want to reach a higher level through your balance.
- Begin direct investment or join an entrusted investment campaign.